Gitlab
| 官方文档([GitLab Docs | GitLab](https://docs.gitlab.com/ee/)) |
Linux 服务器: 安装Gitlab
Window /Linux服务器:安装Gitlab runner, powershell(系统自带),Git(与Git lab交互拉取,推送代码)。
安装Gitlab
从Linux Package安装
| [Download and install GitLab | GitLab](https://about.gitlab.com/install/) |
以CentOS为例
# 可选:在系统防火墙中打开 HTTP、HTTPS 和 SSH 访问
sudo yum install -y curl policycoreutils-python openssh-server perl
# Enable OpenSSH server daemon if not enabled: sudo systemctl status sshd
sudo systemctl enable sshd
sudo systemctl start sshd

# Check if opening the firewall is needed with: sudo systemctl status firewalld
sudo firewall-cmd --permanent --add-service=http
sudo firewall-cmd --permanent --add-service=https
sudo systemctl reload firewalld
# 可选:安装 Postfix 以发送通知电子邮件
sudo yum install postfix
sudo systemctl enable postfix
sudo systemctl start postfix
## 添加 GitLab 包存储库
curl https://packages.gitlab.com/install/repositories/gitlab/gitlab-ee/script.rpm.sh | sudo bash

## 安装Gitlab-ce(社区版),ee(商业版)
sudo yum install -y gitlab-ce
# 备用选项:访问不通可更换镜像源,新建文件/etc/yum.repos.d/gitlab-ce.repo
# 或者直接下载rpm包,https://mirrors.tuna.tsinghua.edu.cn/gitlab-ce/yum/el7/
[gitlab-ce]
name=Gitlab CE Repository
baseurl=https://mirrors.tuna.tsinghua.edu.cn/gitlab-ce/yum/el$releasever/
gpgcheck=0
enabled=1

# 然后执行安装
sudo yum makecache
sudo yum install -y gitlab-ce
从Docker安装
# 配置一个新的环境变量
export GITLAB_HOME=/srv/gitlab

# 使用 Docker 引擎安装 GitLab
sudo docker run --detach \
  --hostname gitlab.example.com \
  --publish 443:443 --publish 80:80 --publish 22:22 \
  --name gitlab \
  --restart always \
  --volume $GITLAB_HOME/config:/etc/gitlab \
  --volume $GITLAB_HOME/logs:/var/log/gitlab \
  --volume $GITLAB_HOME/data:/var/opt/gitlab \
  gitlab/gitlab-ce:latest

# 使用以下命令中的用户名和密码登录:root
sudo docker exec -it gitlab grep 'Password:' /etc/gitlab/initial_root_password
管理Gitlab
 # 查看gitlab版本
 head -1 /opt/gitlab/version-manifest.txt
 # 查看gitlab运行状态
 sudo gitlab-ctl status
用vim打开gitlab的配置文件:vim /etc/gitlab/gitlab.rb
完成配置后,执行 gitlab-ctl reconfigure 使配置生效。
-
修改URL和系统端口:
external_url 'http://127.0.0.1'改为:external_url 'http://<服务器地址或域名>:<端口>'连接wifi后获取服务器地址为10.55.3.117,external_url设置为
'http://10.55.3.117'后,连同一WiFi设备(即同一局域网下)可访问gitlab。 -
修改GitLab头像Gravatar源
vim /etc/gitlab/gitlab.rb
gitlab_rails['gravatar_plain_url'] = 'http://sdn.geekzu.org/avatar/%{hash}?s=%{size}&d=identicon'
gitlab_rails['gravatar_ssl_url'] = 'http://sdn.geekzu.org/avatar/%{hash}?s=%{size}&d=identicon'
- 浏览管理页面并登录
浏览器访问本机地址'http://127.0.0.1'或者自定义的域名'http://10.55.3.117'
密码将在安装过程随机生成并存储 24 小时。用户名root 密码/etc/gitlab/initial_root_password
- 重置用户密码
sudo gitlab-rake "gitlab:password:reset"
# GitLab 要求输入用户名、密码和密码确认。(8位以上,可直接重置管理员密码,已修改为rootroot)
5.选择语言 setting —-preferences—-Localization—简体中文
安装Gitlab Runner
| [安装 GitLab Runner | GitLab](https://docs.gitlab.com/runner/install/) |
在Windows上安装 GitLab Runner
-
下载64 位或32 位的二进制文件放到路径 C:\GitLab-Runner 文件夹下,重命名为gitlab-runner.exe
-
以管理员身份运行CMD
# 安装为服务
cd C:\GitLab-Runner
# 使用用户账号安装
.\gitlab-runner.exe install --user ENTER-YOUR-USERNAME --password ENTER-YOUR-PASSWORD
# 以管理员账号安装
.\gitlab-runner.exe install
.\gitlab-runner.exe start
# 注册一个runner ./gitlab-runner.exe register # 之后输入URL, Token, description for the runner, tags for the runner # URL和token位置:项目设置->Settings->CI/CD->Runner # !!tags:当在yml脚本里使用他的时候,根据tags 指定要使用的runner。不同tag对应runner可以有不同的系统环境。tags必须是唯一的,一个项目下的url和token可以公用,但是输入tags的时候一定要注意不要重复。不然之后自动化部署会出现问题。 # 最后选择excutor:选择shell. #可选项如下:Enter an executor: virtualbox, docker-ssh+machine, kubernetes, custom, docker-windows, docker-ssh, shell, docker, parallels, ssh, docker+machine在不同的服务器或者本地计算机上注册尽可能多的runner。gitlab 服务器查看结果如下:
在Linux服务器上安装GitlabRunner
对于 Debian 或 Ubuntu:
# Replace ${arch} with any of the supported architectures, e.g. amd64, arm, arm64
# A full list of architectures can be found here https://gitlab-runner-downloads.s3.amazonaws.com/latest/index.html
# 下载
curl -LJO "https://gitlab-runner-downloads.s3.amazonaws.com/latest/deb/gitlab-runner_${arch}.deb"

# 安装
dpkg -i gitlab-runner_<arch>.deb
对于 CentOS 或 Red Hat Enterprise Linux:
# Replace ${arch} with any of the supported architectures, e.g. amd64, arm, arm64
# A full list of architectures can be found here https://gitlab-runner-downloads.s3.amazonaws.com/latest/index.html
# 下载
curl -LJO "https://gitlab-runner-downloads.s3.amazonaws.com/latest/rpm/gitlab-runner_${arch}.rpm"

# 安装
rpm -i gitlab-runner_<arch>.rpm
# 更新
rpm -Uvh gitlab-runner_<arch>.rpm
或者从官方软件包安装
# 对于 Debian/Ubuntu/Mint
curl -L "https://packages.gitlab.com/install/repositories/runner/gitlab-runner/script.deb.sh" | sudo bash
sudo apt-get install gitlab-runner

# 对于 RHEL/CentOS/Fedora
curl -L "https://packages.gitlab.com/install/repositories/runner/gitlab-runner/script.rpm.sh" | sudo bash
sudo yum install gitlab-runner
或者像windows一样下载和安装二进制文件
# Linux x86-64
sudo curl -L --output /usr/local/bin/gitlab-runner "https://gitlab-runner-downloads.s3.amazonaws.com/latest/binaries/gitlab-runner-linux-amd64"

# Linux x86
sudo curl -L --output /usr/local/bin/gitlab-runner "https://gitlab-runner-downloads.s3.amazonaws.com/latest/binaries/gitlab-runner-linux-386"

# Linux arm
sudo curl -L --output /usr/local/bin/gitlab-runner "https://gitlab-runner-downloads.s3.amazonaws.com/latest/binaries/gitlab-runner-linux-arm"

# Linux arm64
sudo curl -L --output /usr/local/bin/gitlab-runner "https://gitlab-runner-downloads.s3.amazonaws.com/latest/binaries/gitlab-runner-linux-arm64"

# Linux s390x
sudo curl -L --output /usr/local/bin/gitlab-runner "https://gitlab-runner-downloads.s3.amazonaws.com/latest/binaries/gitlab-runner-linux-s390x"

# Linux ppc64le
sudo curl -L --output /usr/local/bin/gitlab-runner "https://gitlab-runner-downloads.s3.amazonaws.com/latest/binaries/gitlab-runner-linux-ppc64le"

# 授予其执行权限
sudo chmod +x /usr/local/bin/gitlab-runner
# 创建一个 GitLab CI 用户
sudo useradd --comment 'GitLab Runner' --create-home gitlab-runner --shell /bin/bash
# 安装并作为服务运行
sudo gitlab-runner install --user=gitlab-runner --working-directory=/home/gitlab-runner
sudo gitlab-runner start
之后和windows一样注册runner。
Runner配置
在安装gitlab-runner.exe的时候会生产一个配置文件:config.toml
针对windows的powershell,文件中shell = ‘pwsh’要改成shell = ‘powershell’
concurrent = 1
check_interval = 0

[session_server]
  session_timeout = 1800

[[runners]]
  name = "ci/cd test"
  url = "http://10.55.3.117/"
  token = "wkbu-JTWgei1347EPf-y"
  executor = "shell"
  shell = "powershell"
  [runners.custom_build_dir]
  [runners.cache]
    [runners.cache.s3]
    [runners.cache.gcs]
    [runners.cache.azure]
CI/CD
GitLab CI介绍
- GitLab提交持续集成服务,在项目根目录中添加
.gitlab-ci.yml文件,并配置项目的运行器(GitLab Runner),那么后续的每次提交都会触发CI流水线(pipeline)的执行。 .gitlab-ci.yml文件告诉runner需要做哪些事情,默认情况下,流水线有build、test、deploy三个阶段,即构建、测试、部署,未被使用的阶段将会被自动忽略。- 如果一切运行正常(没有非零返回值),可以在查看代码之前轻松查看提交是否导致任何测试失败。
- 大多数项目使用GitLab的CI服务来运行测试套件,以便开发人员在破坏某些内容时可以立即获得反馈。使用持续交付和持续部署将测试代码自动部署到模拟环境和生产环境的趋势越来越明显。
- 由于将
.gitlab-ci.yml文件存放在仓库中进行版本控制,使用单一的配置文件来控制流水线,具有读访问权限的每个人都可以查看内容,从而使其更有吸引力地改进和查看构建脚本。旧的版本也能构建成功,forks项目也容易使用CI,分支可以有不同的流水线和作业。
Window下CI持续集成
现以Monitoring这个项目为例进行自动化测试。
-
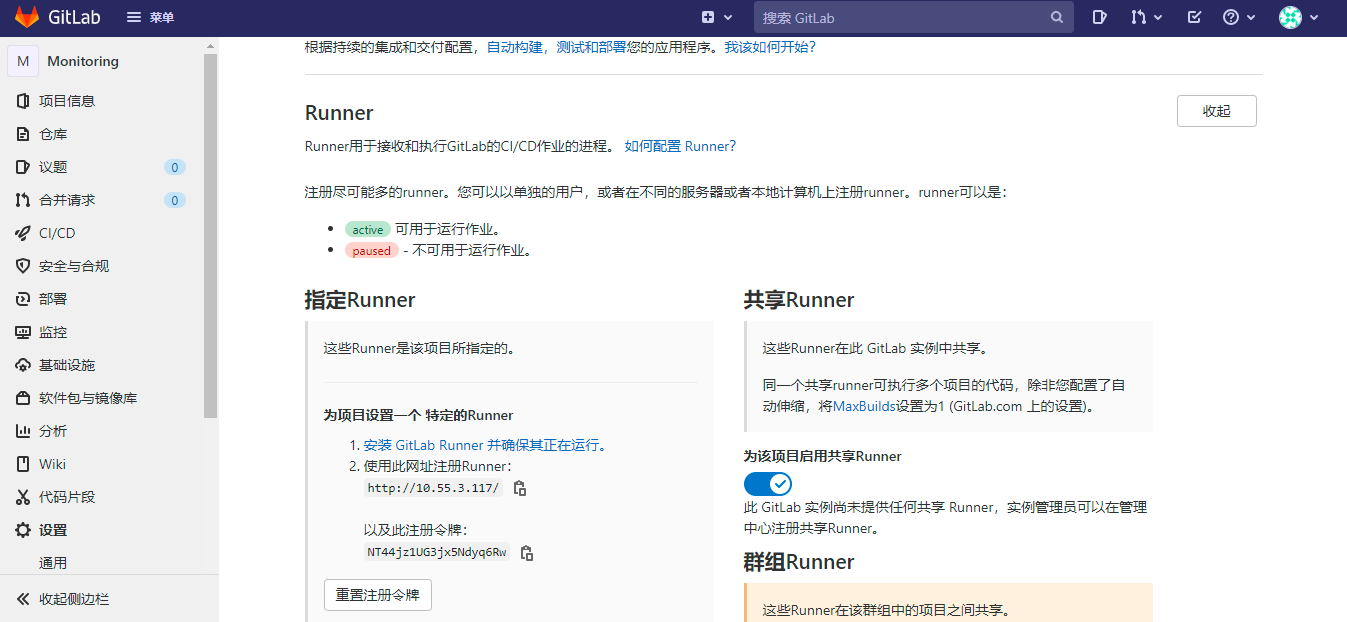
转到“CI/CD >设置”,然后展开”Runner“。确保有Runner可用于运行作业。
-
需要创建.gitlab-ci.yml,这个文件是CI/CD 执行时的配置文件。
在此文件中,可以定义:
- Runner应执行的作业的结构和顺序。
- Runner在遇到特定情况时应做出的决定。
-
在gitlab的web界面增加文件,之后在CI/CD—>编辑器可以方便编辑yml文件并提交测试。
推荐web中的管道编辑器内编辑yml,可浏览模板,可使用自动语法突出显示和验证编辑管道配置。
-
gitlab-ci.yml文件的简单示例,更多可参考文档“.gitlab-ci.yml”文件
.shared_windows_runners:
  tags:
    - ace

stages:
  - build
  - test
  - deploy

before_script:
 - Set-Variable -Name "time" -Value (date -Format "%H:%m")
 - echo ${time}
 - echo "started by ${GITLAB_USER_NAME}"

job1-build:
  extends:
    - .shared_windows_runners
  stage: build
  script:
    - echo "running scripts in the build job"

job2-test:
  extends:
    - .shared_windows_runners
  stage: test
  script:
    - echo "running scripts in the test job"

job3-deploy:
  extends:
    - .shared_windows_runners
  stage: deploy
  script:
    - echo "running scripts in the deploy job"
- tags:关键字,可选,用于选择对应的runner;
- stages:关键字,可选,用于自定义任务流程。若缺失,默认流程为:build > test > deploy;
- job1:任务名称,可自由定义,可包含空格;
- stage:关键字,用于指定任务在什么stage运行;
- script:关键字,按顺序撰写该任务的shell脚本;
- only:关键字,用于指定依赖的代码分支;
-
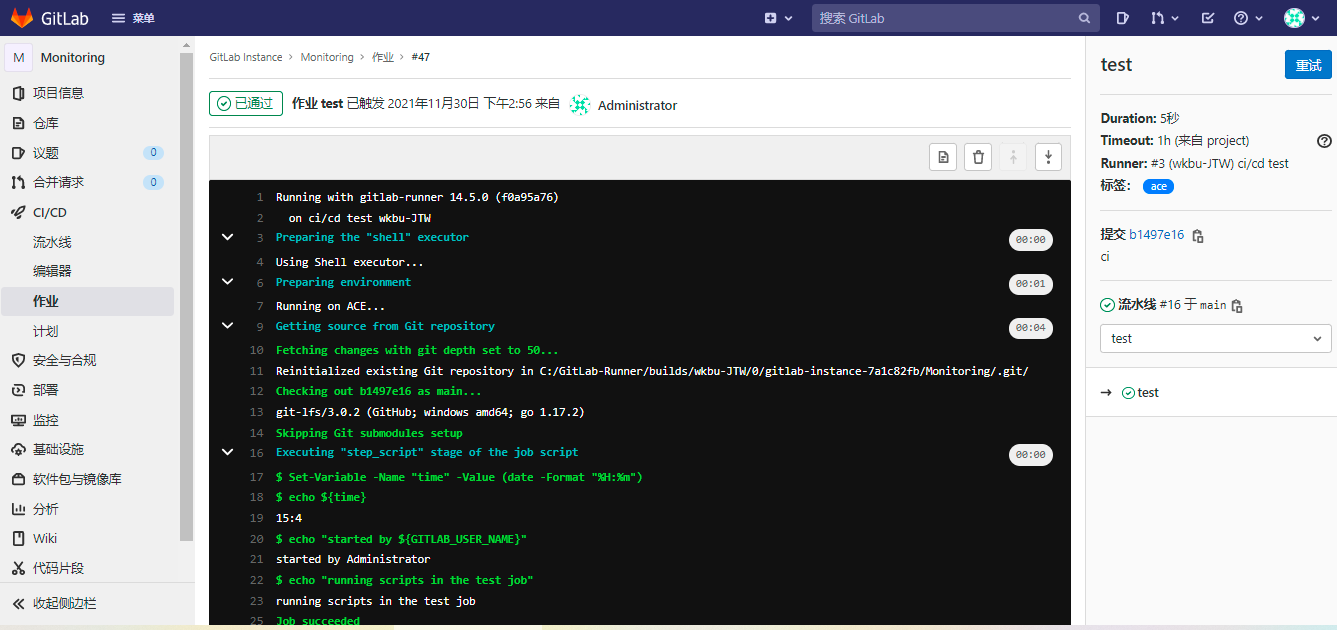
提交修改或者推送后,gitlab-runner会自动拉取代码,然后执行一系列yml文件中shell命令。
在CI/CD-作业可查看执行记录和实时日志。
GitLab CI配置文件.gitlab-ci.yml详解
.gitlab-ci.yml定义每个项目的流水线的结构和顺序,由以下两个因素决定:
- GiTlab Runner运行器使用的执行器(
executor),执行器常用的Shell、Docker、Kubernets。- 遇到进程成功或失败时等条件时做出的决定。
- 查看流水线的简单示例(见上一个章节):Getting started with GitLab CI/CD
- 更多流水线模板:GitLab CI/CD Examples
- 在流水线脚本中可以使用预定义的全局变量,详细可查看 GitLab CI/CD Variables
.gitlab-ci.yml配置参数
| 关键字 | 描述 |
|---|---|
| script | 必须参数,运行器需要执行的脚本 |
| image | 使用Docker image镜像 |
| services | 使用Docker services镜像 |
| before_script | 用于定义在所有作业之前需要执行的命令,比如更新代码、安装依赖、打印调试信息之类的事情。 |
| after_script | 用于定义在所有作业(即使失败)之后需要执行的命令,比如清空工作空间。 |
| stages | 定义流水线所有的阶段。 |
默认有三个阶段, build 、test 、deploy 三个阶段,即 构建 、测试 、部署 |
|
| stage | 定义流水线中每个作业所处的阶段,处于相同阶段的作业并行执行。默认test阶段。 |
| only | 定义了哪些分支或标签(branches and tags)的作业会运行,可以使用正则表达式。 |
| except | 定义了哪些分支或标签(branches and tags)的作业不会运行,可以使用正则表达式。 |
| tags | 用于指定 GitLab Runner 运行器使用哪一个运行器来执行作业。 |
| allow_failure | 设置 allow_failure: true允许作业失败,失败的作业不影响后续的CI组件,不影响提交的状态。 |
| when | 什么时候运行作业。 |
on_success、 on_failure 、always、 manual 、delayed |
|
| environment | 用于定义作业部署到特殊的环境中 |
| 开发环境(development)、集成环境(integration)、测试环境(testing)、QA验证,模拟环境(staging)、生产环境(production)。 | |
| cache | 指定需要在job之间缓存的文件或目录 |
| artifacts | 归档文件列表,指定成功后应附加到job的文件和目录的列表 |
| dependencies | 当前作业依赖的其他作业,你可以使用依赖作业的归档文件 |
| coverage | 可以从作业的输出log中提取代码覆盖率 |
| coverage: ‘/Code coverage:\d+.\d+%/’ | |
| retry | 重试关键字用于配置当作业失败时可以重新执行的次数 |
| retry: 2 | |
| extends | 控制实体从哪里继承 |
| extends: - .shared_windows_runners |
|
| variables | 通过 variables 关键字配置全局变量或者作业级的局部变量 |
特殊的yaml功能
使用特殊的YAML功能,如点号( . ),锚点( & ),别名( * )和合并( << ),降低 .gitlab-ci.yml 的复杂性。